Design a Javascript Application Using Google Tutorial
The Maps JavaScript API lets you customize maps with your own content and imagery for display on web pages and mobile devices. The Maps JavaScript API features four basic map types (roadmap, satellite, hybrid, and terrain) which you can modify using layers and styles, controls and events, and various services and libraries.
Audience
This documentation is designed for people familiar with JavaScript programming and object-oriented programming concepts. You should also be familiar with Google Maps from a user's point of view. There are many JavaScript tutorials available on the Web.
This conceptual documentation is designed to let you quickly start exploring and developing applications with the Maps JavaScript API. We also publish the Maps JavaScript API Reference.
Hello, World
The easiest way to start learning about the Maps JavaScript API is to see a simple example. The following example displays a map centered on Sydney, New South Wales, Australia.
TypeScript
let map: google.maps.Map; function initMap(): void { map = new google.maps.Map(document.getElementById("map") as HTMLElement, { center: { lat: -34.397, lng: 150.644 }, zoom: 8, }); } JavaScript
let map; function initMap() { map = new google.maps.Map(document.getElementById("map"), { center: { lat: -34.397, lng: 150.644 }, zoom: 8, }); } CSS
/* Always set the map height explicitly to define the size of the div * element that contains the map. */ #map { height: 100%; } /* Optional: Makes the sample page fill the window. */ html, body { height: 100%; margin: 0; padding: 0; } HTML
<!DOCTYPE html> <html> <head> <title>Simple Map</title> <script src="https://polyfill.io/v3/polyfill.min.js?features=default"></script> <link rel="stylesheet" type="text/css" href="./style.css" /> <script src="./index.js"></script> </head> <body> <div id="map"></div> <!-- Async script executes immediately and must be after any DOM elements used in callback. --> <script src="https://maps.googleapis.com/maps/api/js?key=YOUR_API_KEY&callback=initMap&v=weekly" async ></script> </body> </html>
View example
let map; function initMap() { map = new google.maps.Map(document.getElementById("map"), { center: { lat: -34.397, lng: 150.644 }, zoom: 8, }); }
/* Always set the map height explicitly to define the size of the div * element that contains the map. */ #map { height: 100%; } /* Optional: Makes the sample page fill the window. */ html, body { height: 100%; margin: 0; padding: 0; }
<!DOCTYPE html> <html> <head> <title>Simple Map</title> <script src="https://polyfill.io/v3/polyfill.min.js?features=default"></script> <!-- jsFiddle will insert css and js --> </head> <body> <div id="map"></div> <!-- Async script executes immediately and must be after any DOM elements used in callback. --> <script src="https://maps.googleapis.com/maps/api/js?key=AIzaSyB41DRUbKWJHPxaFjMAwdrzWzbVKartNGg&callback=initMap&v=weekly&channel=2" async ></script> </body> </html>
Try Sample
Even in this simple example, there are a few things to note:
- We declare the application as HTML5 using the
<!DOCTYPE html>declaration. - We create a
divelement named "map" to hold the map. - We define a JavaScript function that creates a map in the
div. - We load the Maps JavaScript API using a
scripttag.
These steps are explained below.
Declaring your application as HTML5
We recommend that you declare a true DOCTYPE within your web application. Within the examples here, we've declared our applications as HTML5 using the simple HTML5 DOCTYPE as shown below:
<!DOCTYPE html>
Most current browsers will render content that is declared with this DOCTYPE in "standards mode" which means that your application should be more cross-browser compliant. The DOCTYPE is also designed to degrade gracefully; browsers that don't understand it will ignore it, and use "quirks mode" to display their content.
Note that some CSS that works within quirks mode is not valid in standards mode. In specific, all percentage-based sizes must inherit from parent block elements, and if any of those ancestors fail to specify a size, they are assumed to be sized at 0 x 0 pixels. For that reason, we include the following <style> declaration:
<style> #map { height: 100%; } html, body { height: 100%; margin: 0; padding: 0; } </style> This CSS declaration indicates that the map container <div> (with id map) should take up 100% of the height of the HTML body. Note that we must specifically declare those percentages for <body> and <html> as well.
Loading the Maps JavaScript API
The Maps JavaScript API is loaded using a script tag, which can be added inline in your HTML file or dynamically using a separate JavaScript file. We recommend that you review both approaches, and choose the one that is most appropriate for how the code in your project is structured.
Inline Loading
To load the Maps JavaScript API inline in an HTML file, add a script tag as show below.
<script async src="https://maps.googleapis.com/maps/api/js?key=YOUR_API_KEY&callback=initMap"> </script> Dynamic Loading
To dynamically load the Maps JavaScript API inline using a separate JavaScript file, see the example below. This approach allows you to handle all of your code for working with the API from a separate .js file, and is the equivalent of adding the script tag inline.
// Create the script tag, set the appropriate attributes var script = document.createElement('script'); script.src = 'https://maps.googleapis.com/maps/api/js?key=YOUR_API_KEY&callback=initMap'; script.async = true; // Attach your callback function to the `window` object window.initMap = function() { // JS API is loaded and available }; // Append the 'script' element to 'head' document.head.appendChild(script); Dynamic Loading
The @googlemaps/js-api-loader package is available to make a more seamless dynamic loading experience. It can be installed through NPM with the following:
npm install @googlemaps/js-api-loader
This package can be imported into the application with:
import { Loader } from "@googlemaps/js-api-loader" The loader exposes a Promise and callback interface. The following demonstrates usage of the default Promise method load().
TypeScript
const loader = new Loader({ apiKey: "YOUR_API_KEY", version: "weekly", ...additionalOptions, }); loader.load().then(() => { map = new google.maps.Map(document.getElementById("map") as HTMLElement, { center: { lat: -34.397, lng: 150.644 }, zoom: 8, }); }); JavaScript
const loader = new Loader({ apiKey: "YOUR_API_KEY", version: "weekly", ...additionalOptions, }); loader.load().then(() => { map = new google.maps.Map(document.getElementById("map"), { center: { lat: -34.397, lng: 150.644 }, zoom: 8, }); }); Script Tag Attributes
Notice in the examples above that several attributes are set on the `script` tag, which are recommended. The following is an explanation of each attribute.
-
src: The URL where the Maps JavaScript API is loaded from, including all of the symbols and definitions you need for using the Maps JavaScript API. The URL in this example has two parameters:key, where you provide your API key, andcallback, where you specify the name of a global function to be called once the Maps JavaScript API loads completely. Read more about URL parameters. -
async: Asks the browser to asynchronously download and execute the script. When the script is executed, it will call the function specified using thecallbackparameter.
Libraries
When loading the Maps JavaScript API via the URL you may optionally load additional libraries through use of the libraries URL parameter. Libraries are modules of code that provide additional functionality to the main Maps JavaScript API but are not loaded unless you specifically request them. For more information, see Libraries in the Maps JavaScript API.
Synchronously loading the API
In the script tag that loads the Maps JavaScript API, it is possible to omit the defer attribute and the callback parameter. This will cause the loading of the API to block until the API is downloaded.
This will probably slow your page load. But it means you can write subsequent script tags assuming that the API is already loaded.
Map DOM Elements
<div id="map"></div>
For the map to display on a web page, we must reserve a spot for it. Commonly, we do this by creating a named div element and obtaining a reference to this element in the browser's document object model (DOM).
In the example above, we used CSS to set the height of the map div to "100%". This will expand to fit the size on mobile devices. You may need to adjust the width and height values based on the browser's screensize and padding. Note that divs usually take their width from their containing element, and empty divs usually have 0 height. For this reason, you must always set a height on the <div> explicitly.
Map Options
There are two required options for every map: center and zoom.
map = new google.maps.Map(document.getElementById('map'), { center: {lat: -34.397, lng: 150.644}, zoom: 8 }); Zoom Levels
The initial resolution at which to display the map is set by the zoom property, where zoom 0 corresponds to a map of the Earth fully zoomed out, and larger zoom levels zoom in at a higher resolution.
zoom: 8
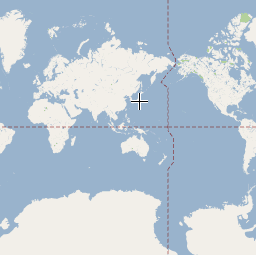
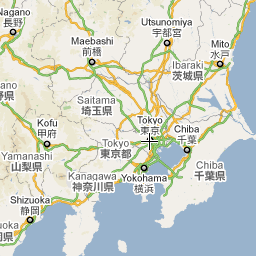
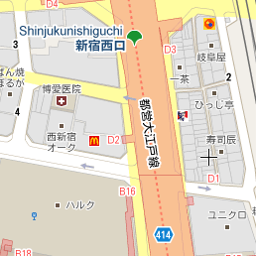
Offering a map of the entire Earth as a single image would either require an immense map, or a small map with very low resolution. As a result, map images within Google Maps and the Maps JavaScript API are broken up into map "tiles" and "zoom levels." At low zoom levels, a small set of map tiles covers a wide area; at higher zoom levels, the tiles are of higher resolution and cover a smaller area. The following list shows the approximate level of detail you can expect to see at each zoom level:
- 1: World
- 5: Landmass/continent
- 10: City
- 15: Streets
- 20: Buildings
The following three images reflect the same location of Tokyo at zoom levels 0, 7 and 18.
For information on how the Maps JavaScript API loads tiles based on the current zoom level, see the guide to map and tile coordinates.
The Map Object
map = new google.maps.Map(document.getElementById("map"), {...}); The JavaScript class that represents a map is the Map class. Objects of this class define a single map on a page. (You may create more than one instance of this class — each object will define a separate map on the page.) We create a new instance of this class using the JavaScript new operator.
When you create a new map instance, you specify a <div> HTML element in the page as a container for the map. HTML nodes are children of the JavaScript document object, and we obtain a reference to this element via the document.getElementById() method.
This code defines a variable (named map) and assigns that variable to a new Map object. The function Map() is known as a constructor and its definition is shown below:
| Constructor | Description |
|---|---|
Map(mapDiv:Node, opts?:MapOptions ) | Creates a new map inside of the given HTML container — which is typically a DIV element — using any (optional) parameters that are passed. |
Troubleshooting
API Key and Billing Errors
Under certain circumstances, a darkened map, or 'negative' Street View image, watermarked with the text "for development purposes only", may be displayed. This behavior typically indicates issues with either an API key or billing. In order to use Google Maps Platform products, billing must be enabled on your account, and all requests must include a valid API key. The following flow will help troubleshoot this:
Are you using an API key?
I'm not sure. How can I check if I am using an API key?
An API key is passed as the key parameter in the URL that is used to load the Maps JavaScript API. Here are a few options to check if you are using an API key:
- Use the Google Maps Platform API Checker Chrome extension. This allows you to determine if your website is properly implementing Google's licensed Maps APIs.
- If you are using a library or plugin to load the Maps JavaScript API, check the settings for that library and look for an API key option.
- Check errors in your browser. If you see the following messages, you are not using your API key correctly:
- Google Maps JavaScript API warning: NoApiKeys
- Google Maps JavaScript API error: MissingKeyMapError
For web developers:
- If you have access to the source code of your application, look for the
<script>tag which is used to load the Maps JavaScript API. When loading the Maps JavaScript API, substituteYOUR_API_KEYin the code below with your API key.<script async defer src="https://maps.googleapis.com/maps/api/js?key=YOUR_API_KEY&callback=initMap"> </script> - Check the network traffic generated by your website in the browser. In Chrome, this can be viewed using the DevTools Network tab. Here you will see the network requests made by your website. Requests made using the Maps JavaScript API will be under the path
maps/api/js. Here you can confirm if the requests are using thekeyparameter. It may be helpful to filter your network traffic bymaps/api/jswhen viewing the Network tab.
No, I am not using an API key.
To get an API key, click the button below. If you do not see a guided setup, follow the full instructions at Get Started with Google Maps Platform.
Get Started
Yes, I am using an API key.
Great! Let's move on and check if a billing account is attached to your project.
Is a billing account attached to your project?
I'm not sure. How can I check if billing account is attached to my project?
Go to the Billing page in the Google Cloud Console and select the project under which your API key was created. To confirm the key is associated with the project:
- Go to the Credentials section, which can be accessed from the left side bar under Google Maps Platform > Credentials.
- Check that the API key you currently use on your website is listed. If that's not the case, switch to a different project, and check the credentials there.
- If you cannot locate the project for your API key, you may have lost access to this project. Ask others in your organization for help. If the original project cannot be located, you should:
- Create a new project. This can be done by selecting New Project from the projects list, or by selecting Create Project via the Resource Manager page.
- Create a new API key. This can be done on the Credentials page. Once there click Create credentials and then select API key.
Once you have located your project in the Cloud Console, check if a billing account is attached by navigating to the Billing section in the left side menu.
No, a billing account is not attached to my project.
Go to the Enable Billing page in the Cloud Console and add a billing account to your project. For additional information, see Get Started with Google Maps Platform.
Yes, a billing account is attached to my project.
Great! Let's make sure the provided billing method is valid.
Is the provided billing method no longer valid (for example an expired credit card)?
You can add, remove, or update a payment method in the Cloud Console.
Is there an exceeded self-imposed daily limit on the API?
If you have set a daily limit on any of your APIs, which is common to prevent unexpected increases, you can resolve this by increasing your daily limit.
You can check your daily limits by going to the APIs & Services Dashboard in the Cloud Console. Once there:
- Select a project if prompted.
- Select an API from the list, then click the Quotas tab.
Does your API key have an IP addresses restriction?
API keys with an IP addresses restriction can only be used with web services that are intended for use from the server side (such as the Geocoding API and other Web Service APIs). Most of these web services have equivalent services within the Maps JavaScript API (for example, see the Geocoding Service). To use the Maps JavaScript API client side services, you will need to create a separate API key which can be secured with an HTTP referrers restriction (see Get, add, and restrict an API key).
If your code isn't working:
To help you get your maps code up and running, Brendan Kenny and Mano Marks point out some common mistakes and how to fix them in this video.
- Look for typos. Remember that JavaScript is a case-sensitive language.
- Check the basics - some of the most common problems occur with the initial map creation. Such as:
- Confirm that you've specified the
zoomandcenterproperties in your map options. - Ensure that you have declared a div element in which the map will appear on the screen.
- Ensure that the div element for the map has a height. By default, div elements are created with a height of 0, and are therefore invisible.
- Confirm that you've specified the
- Use a JavaScript debugger to help identify problems, like the one available in the Chrome Developer Tools. Start by looking in the JavaScript console for errors.
- Post questions to Stack Overflow. Guidelines on how to post great questions are available on the Support page.
Places Library
Offer comprehensive Place data and features to enrich your app with the Maps JavaScript API, including Place Autocomplete, Place details, Place Search, and more.
Learn more
Design a Javascript Application Using Google Tutorial
Source: https://developers.google.com/maps/documentation/javascript/overview
0 Response to "Design a Javascript Application Using Google Tutorial"
Postar um comentário